
- Creating and Publishing a Form
- Conversational Form
- Create Multi Step Forms In WordPress
- Using Calculations in SureForms: A Step-by-Step Guide
- Calculation Formula Guide
- SureForms Login Block – Step-by-Step Guide
- SureForms Registration Block – Step-by-Step Guide
- SureForms – PDF Generation Feature
- GDPR Compliant Forms
- Create WordPress Forms With Conditional Logic
- Adjust Form Notification Emails
- Form Confirmation
- Entries Management Feature Guide
- How to Add Query Parameters to Form Redirects
- How to Fetch Query Parameters from URL
- Set the “From Email” in SureForms
- Setting Up “Reply-To” Email Using Form Input Tags – SureForms
- Restrict Form Entries in SureForms
- Form Scheduling in SureForms
- Conditional Confirmations in SureForms
- SureForms – Send Uploaded File as Email Attachment
- Show Entries in SureForms
- How to Connect Your Stripe Account with SureForms
- How to Connect PayPal in SureForms
- How to Create a Payment Form in SureForms
- SureForms Payments
- How Refunds Work in SureForms Payments
- Understanding Payment Processing Fees
- How to Display the Payment Dashboard on the Frontend (SureForms)
- Enable One-Time Payment and Subscription in a Single Form
- SureForms Integration with ActiveCampaign
- SureForms Integration with AgileCRM
- SureForms Integration with Airtable
- SureForms Integration with LatePoint
- SureForms Integration with FluentCRM
- Connect SureForms To Zapier
- WordPress Forms with the Custom App Builder
- SureForms Integration with Telegram
- SureForms Integration with Breeze
- SureForms Integration with Brevo
- Unable to Upload SureForms ZIP: File Unzipped On Download
- Browser Support for SureForms
- Not Getting Update Notifications
- How To Rollback to Previous SureForms Versions
- Publishing Failed: Invalid JSON Response
- Troubleshooting Email Sending In SureForms
- SureForm Submissions Marked as Spam – How to Fix
- API Request Failed – Nonce Verification Error
- Fixing the “Destination folder already exists” Error When Installing SureForms
- How to Set Up SureForms with Caching Plugins
- srfm_enable_redirect_activation
- sureforms_plugin_action_links
- srfm_quick_sidebar_allowed_blocks
- srfm_integrated_plugins
- srfm_suretriggers_integration_data_filter
- srfm_form_submit_response
- srfm_enable_gutenberg_post_types
- srfm_languages_directory
- srfm_form_template
- srfm_disable_nps_survey
Show Entries in SureForms
Display this form’s entries in a table on the frontend.
The Show Entries feature allows you to display submitted form entries in a structured table layout on the frontend of your website. You can control pagination, visibility, displayed columns, access permissions, and embed the entries table on any page using a shortcode.
Access the Show Entries Settings
To configure Show Entries:
- Navigate to Forms from your WordPress dashboard.
- Open the form where you want to display submitted entries.
- Open Form Settings.
- Select Show Entries from the dropdown.
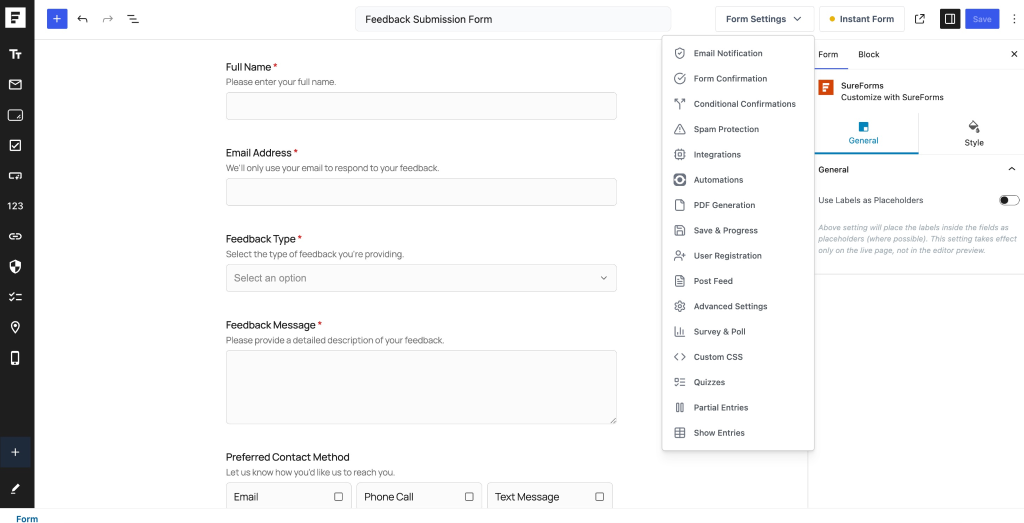
Configure Show Entries Settings
Once enabled, configure the available options below.
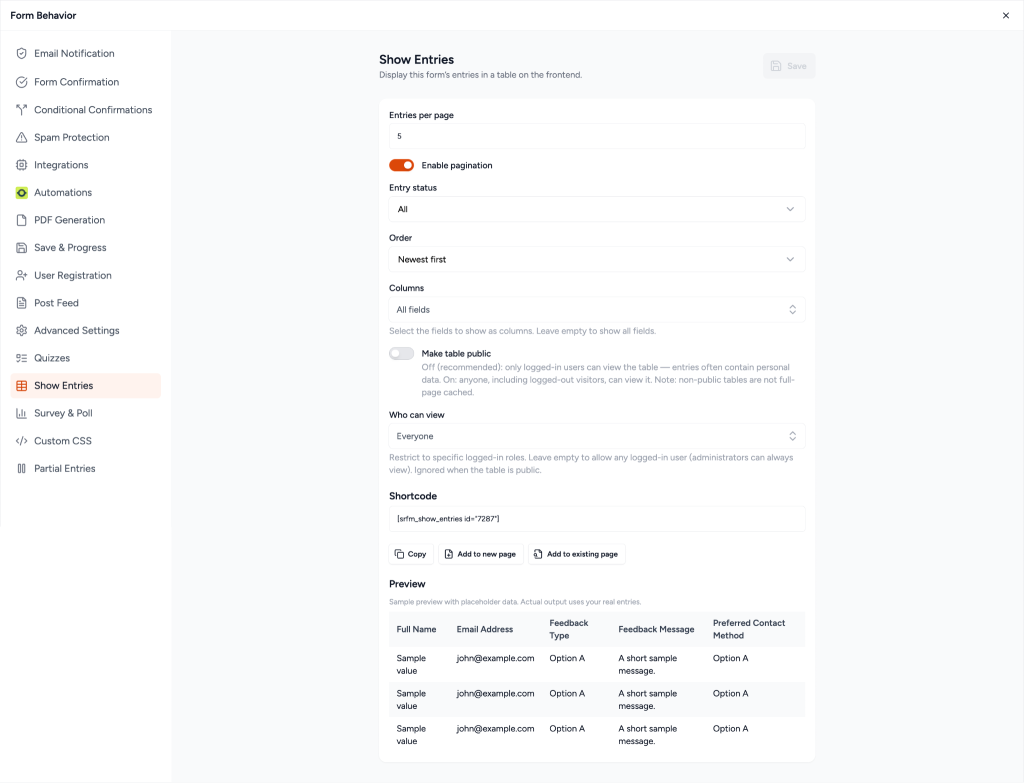
1. Entries per page
Specify how many entries should appear in the table at one time.
Example:
- 5 entries
- 10 entries
- Any custom number
2. Enable Pagination
Enable this option to split entries across multiple pages.
When enabled:
- Entries are grouped into pages.
- Visitors can navigate through pages after reaching the configured entry limit.
3. Entry Status
Choose which entries should appear in the table.
Available options include:
- All
- Read
- Unread
- Trash
This helps filter and display only relevant entries.
4. Order
Control how entries are displayed.
Available options:
- Newest first
- Oldest first
Example:
- Newest first shows recent submissions at the top.
- Oldest first displays submissions chronologically.
5. Columns
Choose which form fields should appear as columns in the frontend table.
By default:
- All fields are displayed.
Optional:
- Select specific fields from the form.
Note: Leave this empty to display all available fields.
6. Make Table Public
Control whether logged-out users can view the table.
Options:
- Off (Recommended)
Only logged-in users can access the entries table. - On
Anyone, including logged-out visitors, can view the table.
Note: Public tables are useful for shared data, but entries may contain personal information.
7. Who Can View
Restrict access based on WordPress user roles.
You can allow:
- Everyone
- Author
- Editor
- Contributor
- Subscriber
- Custom WordPress roles
Leave this empty to allow any logged-in user to access the table.
Note: Administrators can always view entries.
Display Entries Using Shortcode
A shortcode is automatically generated for the form.
Example: [ srfm_show_entries id=”#” ]
Use the Copy button to copy the shortcode and paste it into any page or page builder.
Add Entries Table to a New Page
You can automatically create a new page with the shortcode.
Steps:
- Click Add to new page.
- Enter the New Page Title.
- Click Create.
The page will be created automatically with the shortcode inserted.
Add Entries Table to an Existing Page
You can also insert the shortcode into an existing page.
Steps:
- Click Add to existing page.
- Select a page from the dropdown.
- Save the selection.
The shortcode will be added to the selected page.
Preview the Table
Use the Preview section to view how the entries table will appear on the frontend.
The preview uses sample placeholder data, while the live table displays actual form submissions.
Save the Configuration
After completing all settings:
- Click Save.
- Visit the selected page to verify the entries table on the frontend.
We don't respond to the article feedback, we use it to improve our support content.