
- Creating and Publishing a Form
- Conversational Form
- Create Multi Step Forms In WordPress
- Using Calculations in SureForms: A Step-by-Step Guide
- Calculation Formula Guide
- SureForms Login Block – Step-by-Step Guide
- SureForms Registration Block – Step-by-Step Guide
- SureForms – PDF Generation Feature
- GDPR Compliant Forms
- Create WordPress Forms With Conditional Logic
- Adjust Form Notification Emails
- Form Confirmation
- Entries Management Feature Guide
- How to Add Query Parameters to Form Redirects
- How to Fetch Query Parameters from URL
- Set the “From Email” in SureForms
- Setting Up “Reply-To” Email Using Form Input Tags – SureForms
- Restrict Form Entries in SureForms
- Form Scheduling in SureForms
- Conditional Confirmations in SureForms
- How to Connect Your Stripe Account with SureForms
- How to Connect PayPal in SureForms
- How to Create a Payment Form in SureForms
- SureForms Payments
- How Refunds Work in SureForms Payments
- Understanding Payment Processing Fees
- How to Display the Payment Dashboard on the Frontend (SureForms)
- Enable One-Time Payment and Subscription in a Single Form
- SureForms Integration with ActiveCampaign
- SureForms Integration with AgileCRM
- SureForms Integration with Airtable
- SureForms Integration with LatePoint
- SureForms Integration with FluentCRM
- Connect SureForms To Zapier
- WordPress Forms with the Custom App Builder
- SureForms Integration with Telegram
- SureForms Integration with Breeze
- SureForms Integration with Brevo
- Unable to Upload SureForms ZIP: File Unzipped On Download
- Browser Support for SureForms
- Not Getting Update Notifications
- How To Rollback to Previous SureForms Versions
- Publishing Failed: Invalid JSON Response
- Troubleshooting Email Sending In SureForms
- SureForm Submissions Marked as Spam – How to Fix
- API Request Failed – Nonce Verification Error
- Fixing the “Destination folder already exists” Error When Installing SureForms
- How to Set Up SureForms with Caching Plugins
- How to Set Up SureForms with WP Rocket
- How to Set Up SureForms with W3 Total Cache
- How to Set Up SureForms with WP Fastest Cache
- How to Set Up SureForms with LiteSpeed Cache
- How to Set Up SureForms with SiteGround Optimizer
- How to Set Up SureForms with Autoptimize
- How to Enable Logs in SureForms
- srfm_enable_redirect_activation
- sureforms_plugin_action_links
- srfm_quick_sidebar_allowed_blocks
- srfm_integrated_plugins
- srfm_suretriggers_integration_data_filter
- srfm_form_submit_response
- srfm_enable_gutenberg_post_types
- srfm_languages_directory
- srfm_form_template
- srfm_disable_nps_survey
How to Enable Logs in SureForms
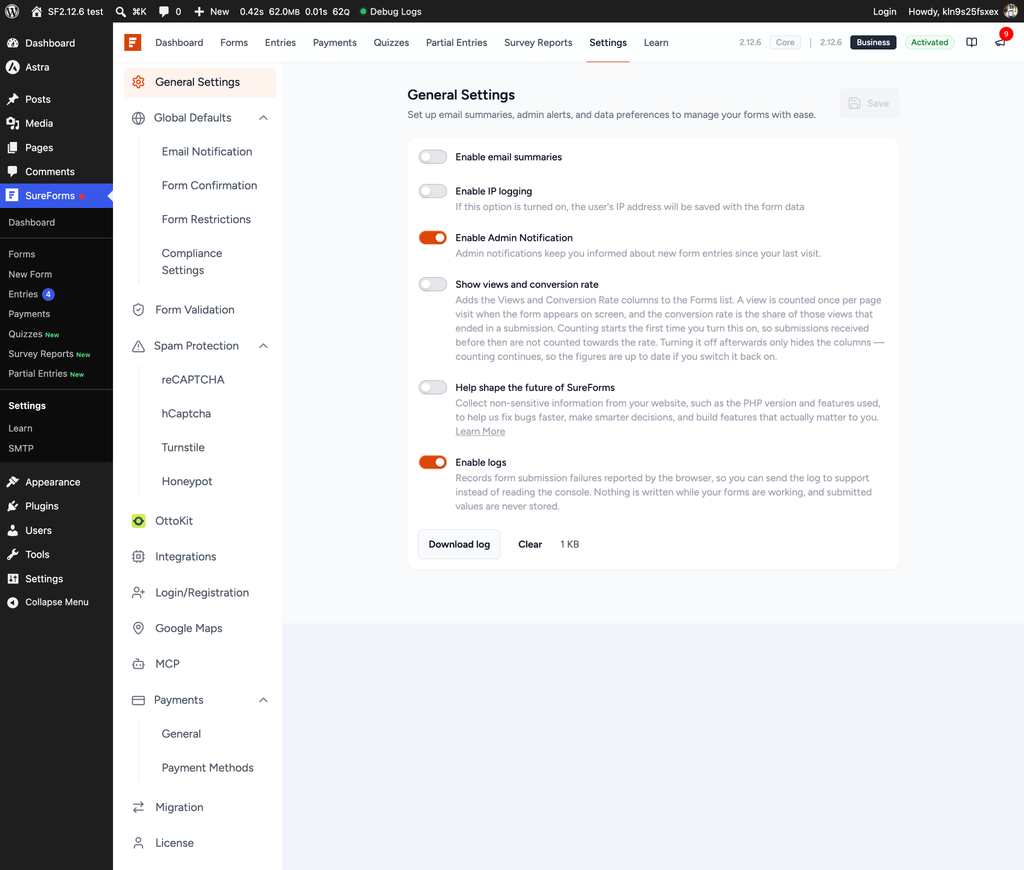
The Enable logs option helps you troubleshoot form submission failures. It records errors reported by a visitor’s browser, allowing you to download the log and share it with the SureForms Support team without checking the browser console.
When to Enable Logs
By default, logs are enabled to record issues when a form fails to submit, displays a server response error, or works inconsistently for certain visitors or devices. Keep logging enabled during troubleshooting so it can capture helpful technical details if the issue occurs again.
Enable Logging
- Open SureForms settings: From your WordPress dashboard, go to SureForms > Settings.
- Open General Settings: Make sure General Settings is selected in the left panel.
- Enable logs: Scroll down to Enable logs and turn on the toggle.
- Save the setting: Click Save in the upper-right corner if the button becomes active.
- Reproduce the issue: Open the affected form and submit it again using the same steps that previously caused the error.
Download and Share the Log
- After the form submission fails, return to SureForms > Settings > General Settings. Under Enable logs, click Download log. A log file will be downloaded to your computer.
- Attach this file when contacting SureForms Support. Also include the form page URL, the approximate time of the failed attempt, and the steps needed to reproduce the issue. This helps the support team locate the relevant error more quickly.
Clear Existing Logs
- Click Clear to remove the existing log data. The size shown beside the button indicates how much log data is currently stored.
- Download the current log first if you still need to share it with support.
- Click Clear to remove older records.
- Reproduce the issue again to create a fresh log that contains only the latest failure.
Important Notes
- The log records only form submission failures reported by the browser.
- Submitted field values are never stored in the log.
- No new log entry is created while your forms are working correctly.
- You can leave logging enabled during troubleshooting and clear the log after the issue is resolved.
Was this doc helpful?
What went wrong?
We don't respond to the article feedback, we use it to improve our support content.