
- Creating and Publishing a Form
- Conversational Form
- Create Multi Step Forms In WordPress
- Using Calculations in SureForms: A Step-by-Step Guide
- Calculation Formula Guide
- SureForms Login Block – Step-by-Step Guide
- SureForms Registration Block – Step-by-Step Guide
- SureForms – PDF Generation Feature
- GDPR Compliant Forms
- Create WordPress Forms With Conditional Logic
- How to Create Inline Forms in SureForms
- How to Add Smart Tags as Default Values in SureForms
- Adding Custom Posts Using SureForms
- Validate as Unique in SureForms
- How to Use Conditional Logic in SureForms
- How to Use OttoKit with Repeater Field in SureForms
- How to Duplicate a Form in SureForms
- Custom Lost Password and Reset Password Pages
- Quiz Feature in SureForms
- SureForms – Survey & Polls Feature
- Using the Google Maps API with SureForms
- How to Move a Published Form to Draft Mode
- Convert HTML Forms to SureForms
- Hide the Submit Button Using Conditional Logic
- Show Views and Conversion Rate
- How to Enable and Manage Form Abandonment in SureForms
- Adjust Form Notification Emails
- Form Confirmation
- Entries Management Feature Guide
- How to Add Query Parameters to Form Redirects
- How to Fetch Query Parameters from URL
- Set the “From Email” in SureForms
- Setting Up “Reply-To” Email Using Form Input Tags – SureForms
- Restrict Form Entries in SureForms
- Form Scheduling in SureForms
- Conditional Confirmations in SureForms
- How to Connect Your Stripe Account with SureForms
- How to Connect PayPal in SureForms
- How to Create a Payment Form in SureForms
- SureForms Payments
- How Refunds Work in SureForms Payments
- Understanding Payment Processing Fees
- How to Display the Payment Dashboard on the Frontend (SureForms)
- Enable One-Time Payment and Subscription in a Single Form
- SureForms Integration with ActiveCampaign
- SureForms Integration with AgileCRM
- SureForms Integration with Airtable
- SureForms Integration with LatePoint
- SureForms Integration with FluentCRM
- Connect SureForms To Zapier
- WordPress Forms with the Custom App Builder
- SureForms Integration with Telegram
- SureForms Integration with Breeze
- SureForms Integration with Brevo
- Unable to Upload SureForms ZIP: File Unzipped On Download
- Browser Support for SureForms
- Not Getting Update Notifications
- How To Rollback to Previous SureForms Versions
- Publishing Failed: Invalid JSON Response
- Troubleshooting Email Sending In SureForms
- SureForm Submissions Marked as Spam – How to Fix
- API Request Failed – Nonce Verification Error
- Fixing the “Destination folder already exists” Error When Installing SureForms
- How to Set Up SureForms with Caching Plugins
- srfm_enable_redirect_activation
- sureforms_plugin_action_links
- srfm_quick_sidebar_allowed_blocks
- srfm_integrated_plugins
- srfm_suretriggers_integration_data_filter
- srfm_form_submit_response
- srfm_enable_gutenberg_post_types
- srfm_languages_directory
- srfm_form_template
- srfm_disable_nps_survey
Using the Google Maps API with SureForms
SureForms allows you to add address autocomplete and map preview to your Address field using the Google Maps API. This helps users fill out address fields faster and shows a visual map preview of the entered location. Before getting started, please complete the setup steps outlined below.
Create a Google Cloud Project
To use the Google Maps API, you must first create a Google Cloud project and enable the required APIs. Open Google Cloud Console.
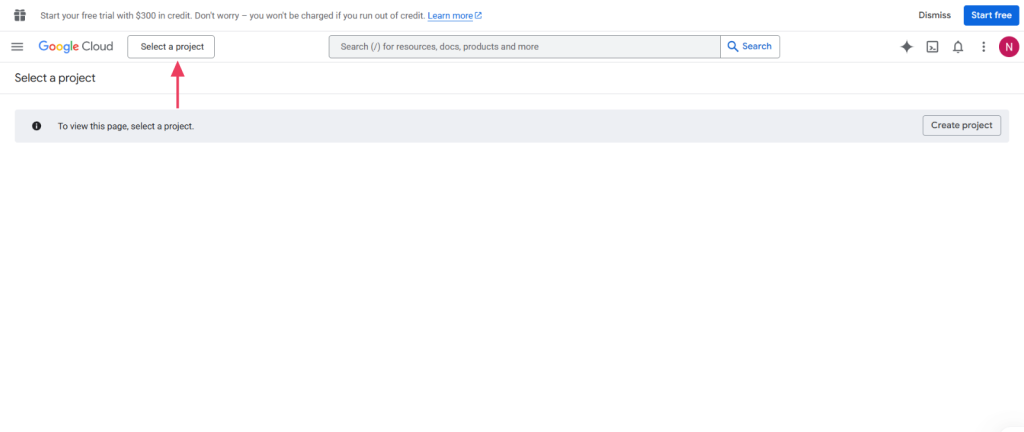
Open the Project Selector
In the top left corner of the console, click on the project dropdown. It may show an existing project name or say “Select a project”.
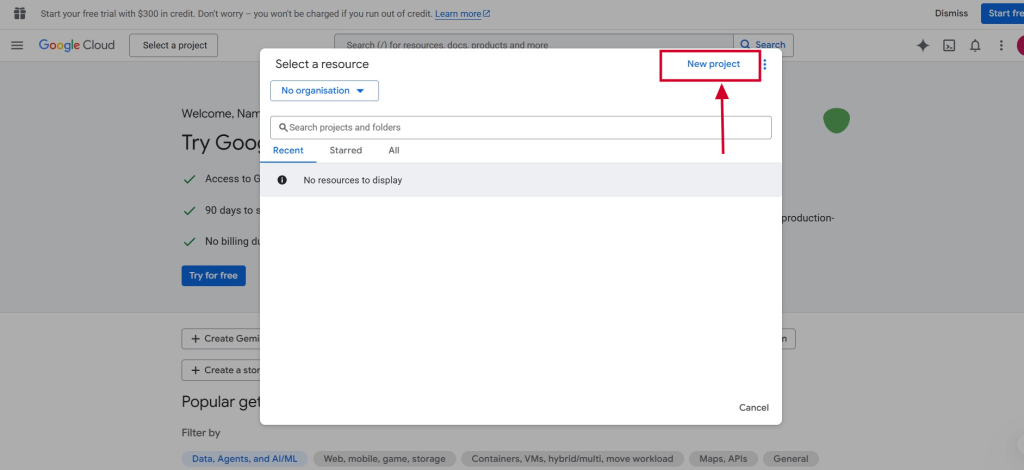
Create a New Project
- Click on “New Project”.
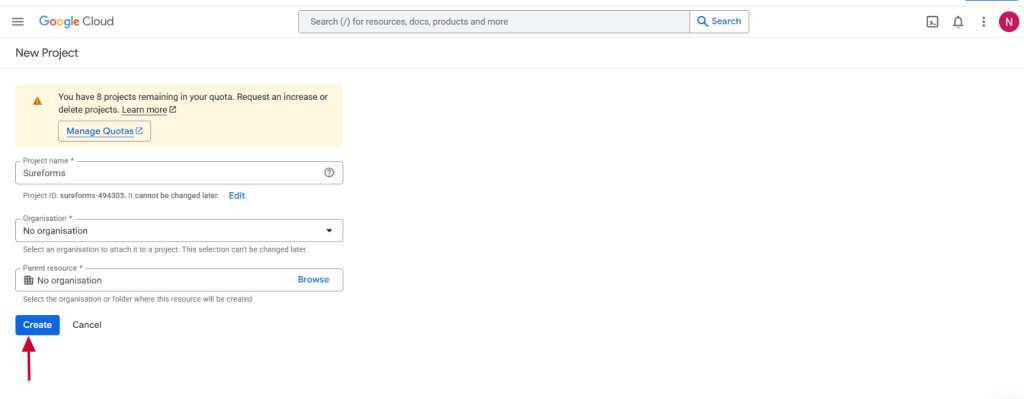
- Enter a name for your project. The Project ID will be generated automatically. If applicable, select an organization. Otherwise, leave it as the default.
- Then click on Create.
Enable Billing on Your Project
Google requires a billing account to be linked to your project before the Maps APIs can be used. Most sites stay well within the free monthly usage tier, but a payment method must still be added.
In the Google Cloud Console, open Billing from the navigation menu.
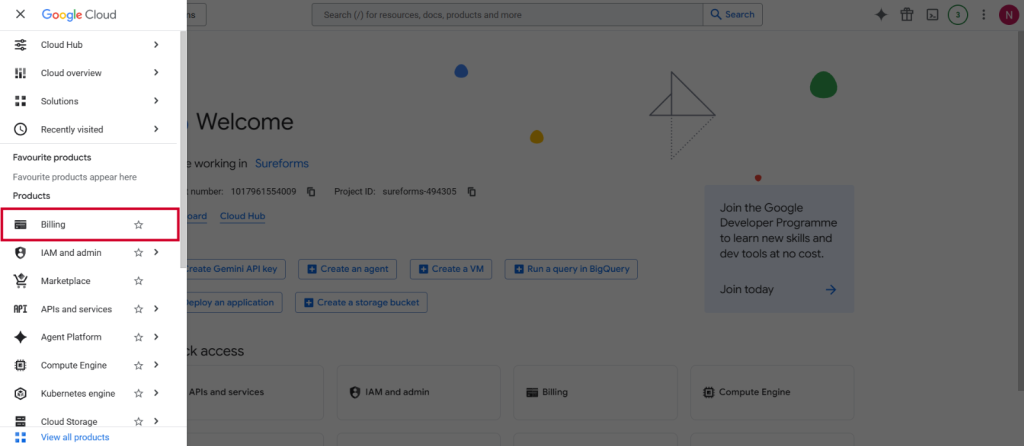
If no billing account is set up yet, click Add billing account and complete the setup before proceeding.
Set a Budget Alert (Recommended)
Before enabling the APIs, set a small budget alert as a safety net.
- Go to Billing, then Budgets & alerts.
- Click on Create Budget.
- Set the amount to a small value like ₹100.
- Enable alerts at 50%, 90%, and 100% thresholds.
- Save the budget.
Enable the Required APIs
SureForms needs three APIs enabled in your Google Cloud project to power the address autocomplete and map preview.
In Google Cloud Console, click the menu icon and navigate to APIs & Services, then select Library.
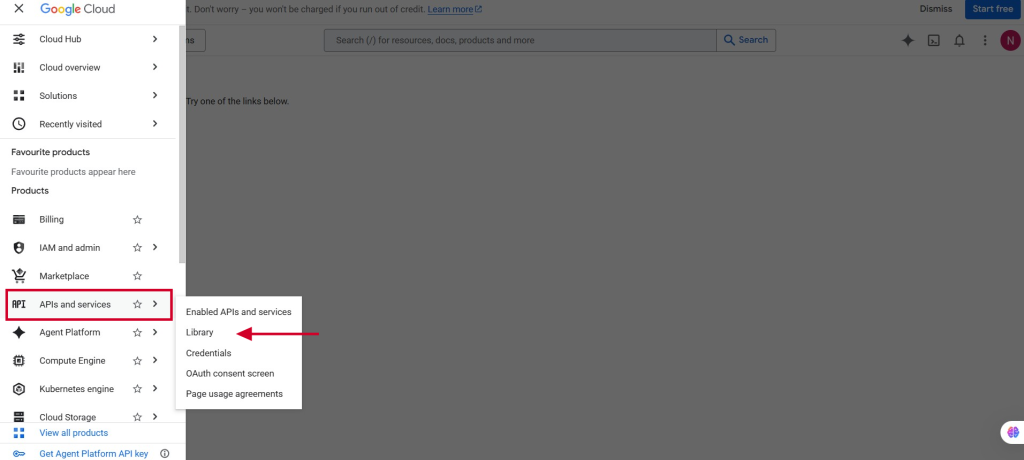
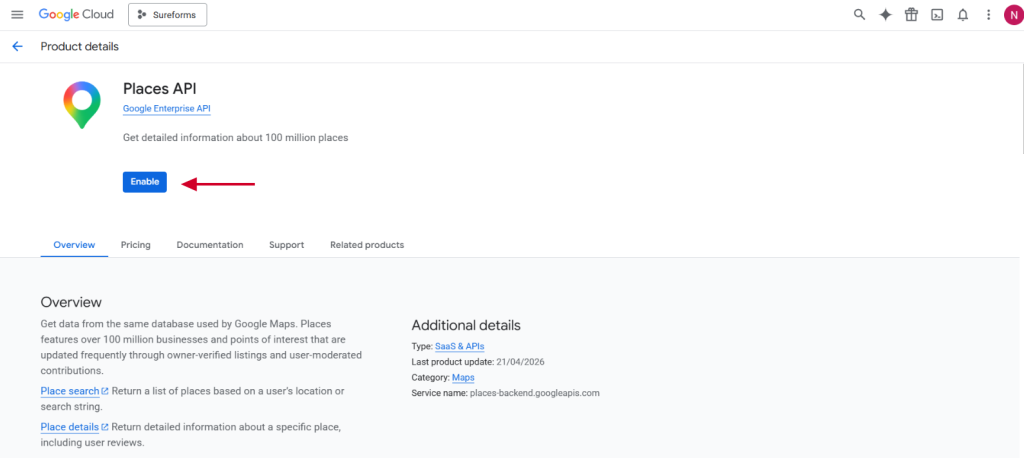
Search for and enable each of the following APIs one by one by clicking the API name and then clicking the Enable button.
- Places API
- Geocoding API
- Maps JavaScript API
Create an API Key
Once the APIs are enabled, you need to create an API key that SureForms will use to authenticate requests.
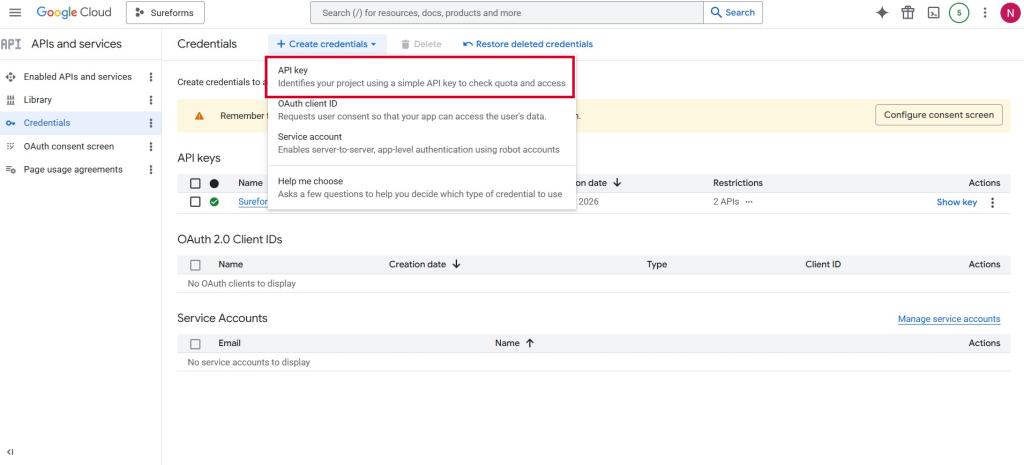
Navigate to APIs & Services, then select Credentials.
Click on Create Credentials at the top, then select API key from the dropdown.
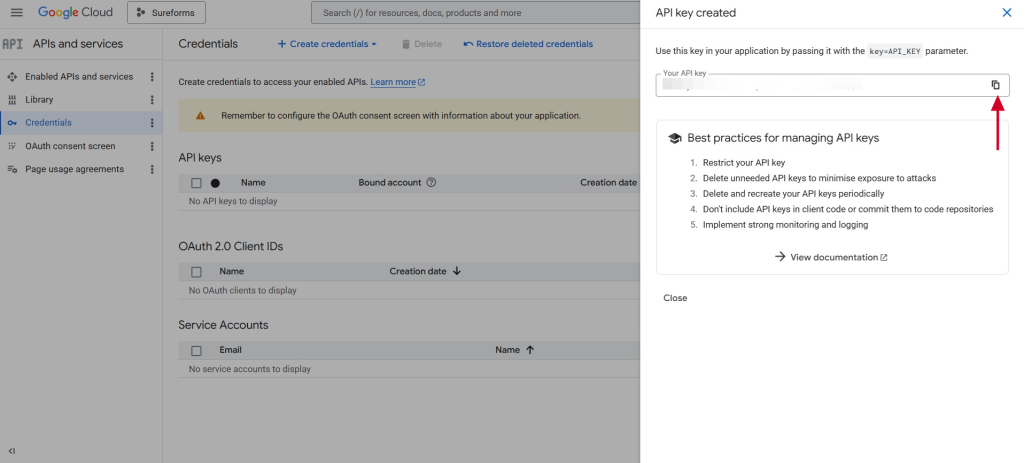
A popup will appear displaying your newly generated API key. Copy the key and keep it safe. You will paste it into SureForms in a later step.
Restrict the API Key
This step is important for security. An unrestricted API key can be copied from your site’s source code and misused by others, which would result in charges to your account.
In the popup, click on the Edit API key.
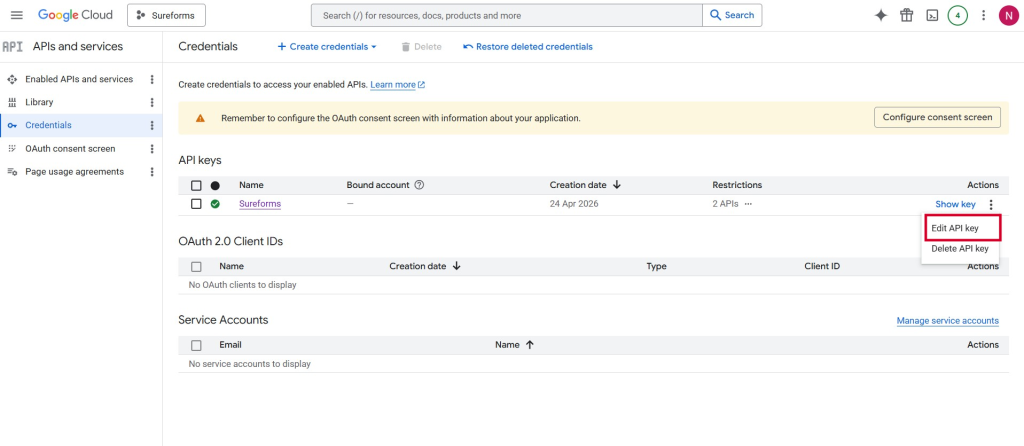
Alternatively, click the key name on the Credentials page to open its settings.
Set Application Restrictions
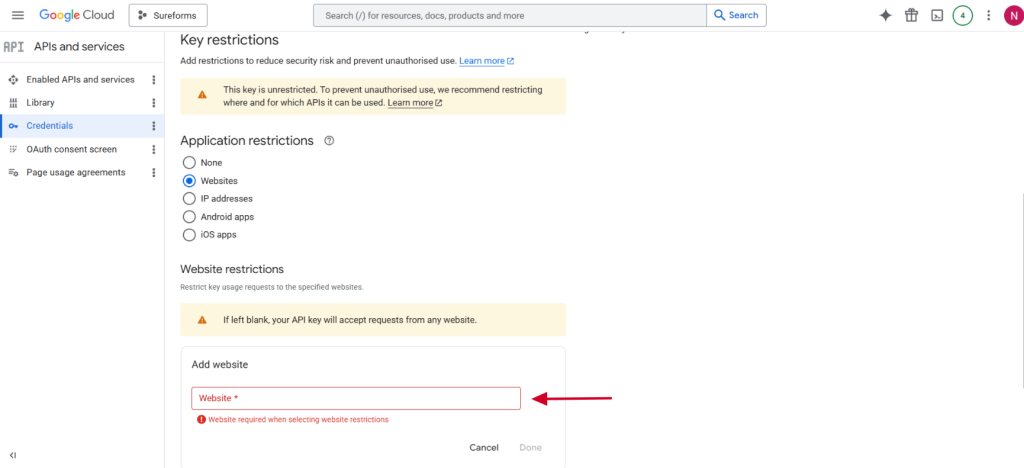
- Under Application restrictions, select Websites.
- Click on Add under Website restrictions.
- Enter your domain in this format: https://yourdomain.com/*
- If your site uses subdomains, also add: https://*.yourdomain.com/*
Set API Restrictions
- Under API restrictions, select the Restrict key.
- From the dropdown, select only: Places API, Geocoding API, and Maps JavaScript API.
- Click Save at the bottom of the page.
Configure Google Maps in SureForms
After completing the setup in Google Cloud Console, you can configure Google Maps in your WordPress dashboard.
- Open the WordPress dashboard and navigate to SureForms.
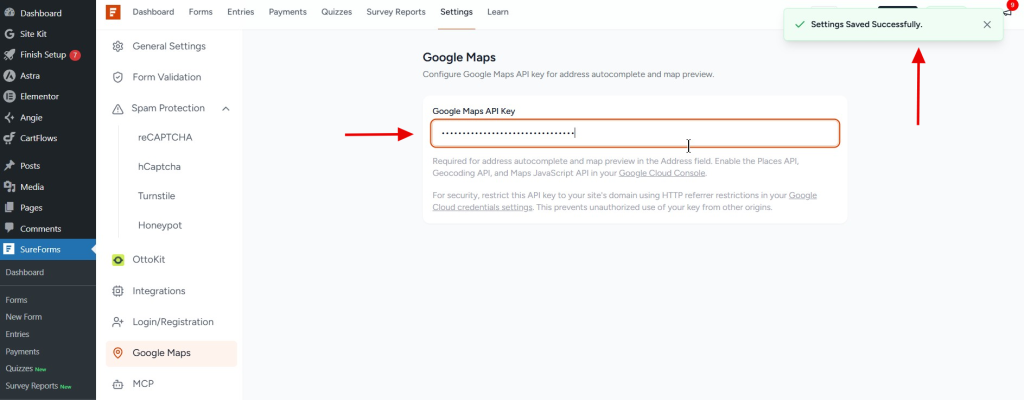
- Go to the Settings section and click on Google Maps.
- Paste the API key you copied earlier into the Google Maps API Key field. Make sure there are no extra spaces at the beginning or end of the pasted content.
- Once it is pasted, it will be saved automatically and a message will appear “Settings Saved Successfully”
Enable Google Maps on Your Form
- Go to SureForms → All Forms and open an existing form, or click Add New Form to create a new one.
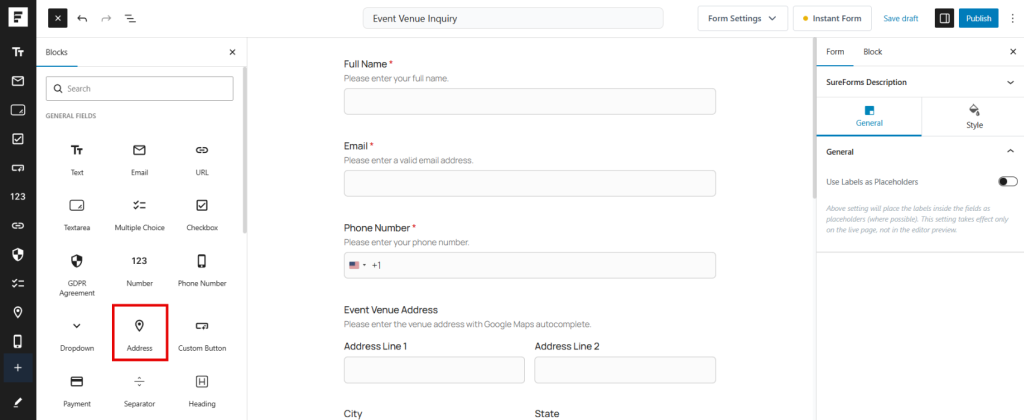
- In the form editor, click the + (Add Block) icon.
- Search for Address under General Fields and insert it into your form.
Note: Google Maps can only be integrated with the Address field so it is necessary for a form to have an address field.
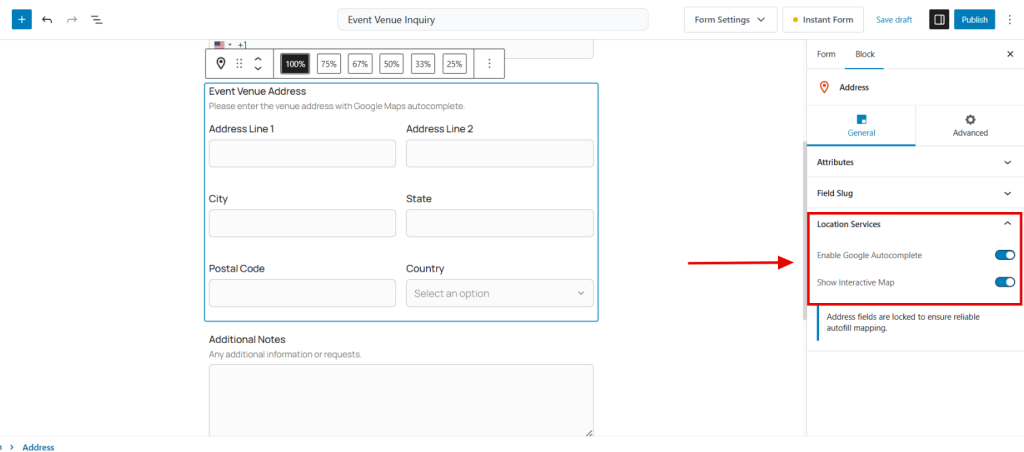
- Click on the Address field to select it. The block settings will appear in the right sidebar.
- In the sidebar, make sure the General tab is active, then scroll to the Location Services section.
- Enable the following toggles based on what you need:
- Enable Google Autocomplete: turns on address suggestions as the user types.
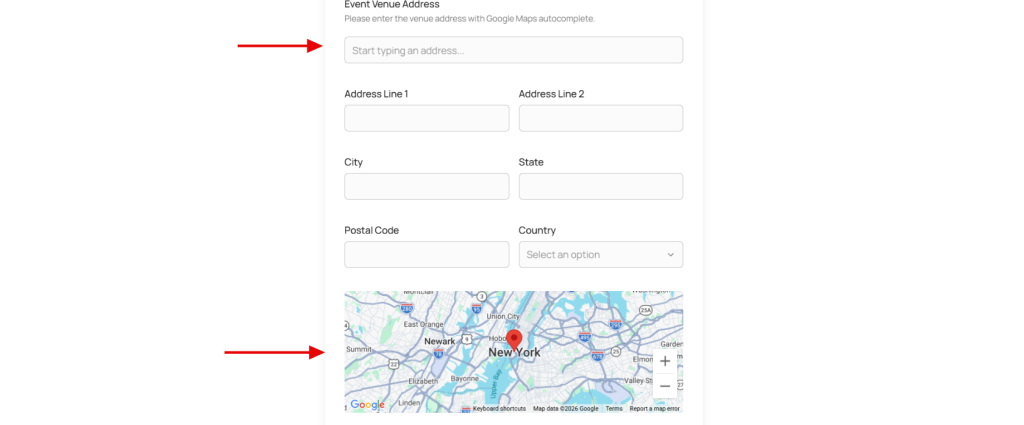
- Show Interactive Map: displays an interactive Google Map with a pin below the Address field. The pin updates automatically when the user selects an address from the autocomplete suggestions.
- Configure the field label, placeholder, and other general settings as needed under the Attributes and Field Slug sections.
- Click Publish or Save to save the form.
- You can preview the form to see the Map embedded along with address field.
We don't respond to the article feedback, we use it to improve our support content.