
- Creating and Publishing a Form
- Conversational Form
- Create Multi Step Forms In WordPress
- Using Calculations in SureForms: A Step-by-Step Guide
- Calculation Formula Guide
- SureForms Login Block – Step-by-Step Guide
- SureForms Registration Block – Step-by-Step Guide
- SureForms – PDF Generation Feature
- GDPR Compliant Forms
- Create WordPress Forms With Conditional Logic
- How to Create Inline Forms in SureForms
- How to Add Smart Tags as Default Values in SureForms
- Adding Custom Posts Using SureForms
- Validate as Unique in SureForms
- How to Use Conditional Logic in SureForms
- How to Use OttoKit with Repeater Field in SureForms
- How to Duplicate a Form in SureForms
- Custom Lost Password and Reset Password Pages
- Test
- Quiz Feature in SureForms
- SureForms – Survey & Polls Feature
- Using the Google Maps API with SureForms
- How to Move a Published Form to Draft Mode
- Convert HTML Forms to SureForms
- Hide the Submit Button Using Conditional Logic
- Show Views and Conversion Rate
- Adjust Form Notification Emails
- Form Confirmation
- Entries Management Feature Guide
- How to Add Query Parameters to Form Redirects
- How to Fetch Query Parameters from URL
- Set the “From Email” in SureForms
- Setting Up “Reply-To” Email Using Form Input Tags – SureForms
- Restrict Form Entries in SureForms
- Form Scheduling in SureForms
- Conditional Confirmations in SureForms
- How to Connect Your Stripe Account with SureForms
- How to Connect PayPal in SureForms
- How to Create a Payment Form in SureForms
- SureForms Payments
- How Refunds Work in SureForms Payments
- Understanding Payment Processing Fees
- How to Display the Payment Dashboard on the Frontend (SureForms)
- Enable One-Time Payment and Subscription in a Single Form
- SureForms Integration with ActiveCampaign
- SureForms Integration with AgileCRM
- SureForms Integration with Airtable
- SureForms Integration with LatePoint
- SureForms Integration with FluentCRM
- Connect SureForms To Zapier
- WordPress Forms with the Custom App Builder
- SureForms Integration with Telegram
- SureForms Integration with Breeze
- SureForms Integration with Brevo
- Unable to Upload SureForms ZIP: File Unzipped On Download
- Browser Support for SureForms
- Not Getting Update Notifications
- How To Rollback to Previous SureForms Versions
- Publishing Failed: Invalid JSON Response
- Troubleshooting Email Sending In SureForms
- SureForm Submissions Marked as Spam – How to Fix
- API Request Failed – Nonce Verification Error
- Fixing the “Destination folder already exists” Error When Installing SureForms
- How to Set Up SureForms with Caching Plugins
- srfm_enable_redirect_activation
- sureforms_plugin_action_links
- srfm_quick_sidebar_allowed_blocks
- srfm_integrated_plugins
- srfm_suretriggers_integration_data_filter
- srfm_form_submit_response
- srfm_enable_gutenberg_post_types
- srfm_languages_directory
- srfm_form_template
- srfm_disable_nps_survey
Quiz Feature in SureForms
The Quiz feature in SureForms transforms any form into a fully scored, graded quiz without leaving the block editor. You define the correct answers, choose how scoring and grading work, and SureForms handles all the calculations and displays the results automatically.
This guide will help you:
- Enable and configure the Quiz feature on any form
- Set up scored questions with correct answers
- Choose a scoring mode and grading system
- Control what respondents see after they submit
- Use quiz smart tags in confirmations and emails
- Review quiz submissions from the Quizzes admin page

Creating a Quiz Form
You can turn any SureForms form into a quiz. There are two ways to get started:
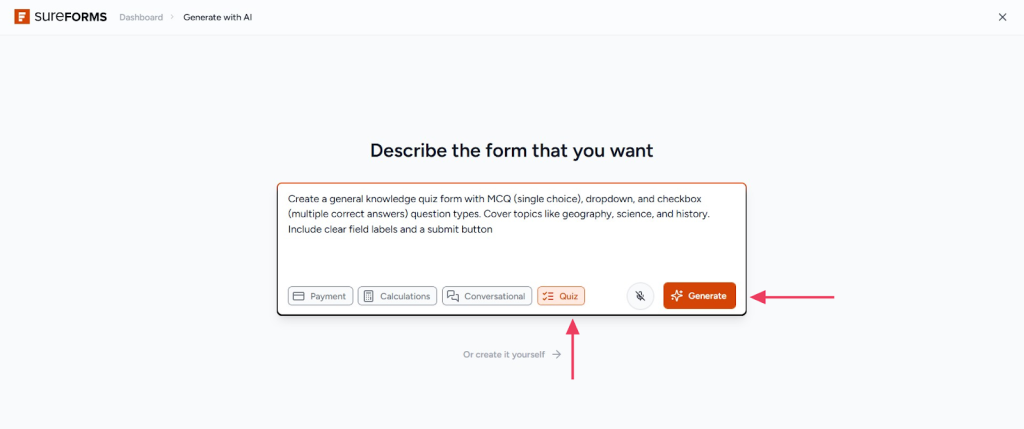
Method 1: AI Form Builder
When creating a new form, select Quiz as the form type. The AI builder generates quiz-ready fields with correct answers pre-configured.
Method 2: Existing Form
Edit any existing form in the Gutenberg editor, open the Quiz settings panel, and toggle the quiz on. SureForms detects compatible fields automatically.
This guide walks through Method 2, enabling the quiz on an existing form. The configuration steps are identical for both methods once the form is open in the editor.
Enabling the Quiz
Open your form in the editor
From your WordPress dashboard, navigate to SureForms → All Forms. Click the form you want to turn into a quiz to open it in the Gutenberg block editor.
Open the Quiz settings panel
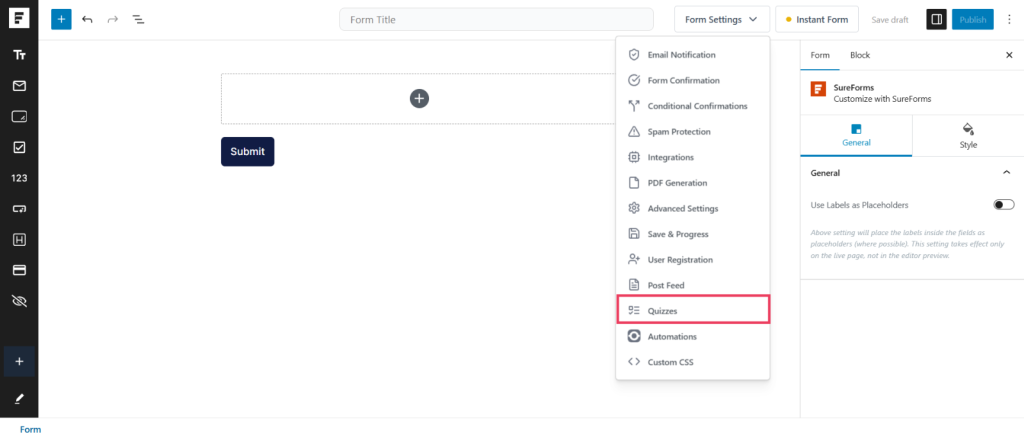
In the form editor, click the Form Settings button in the top-right toolbar. A dropdown menu appears. Click Quizzes to expand the quiz panel in the sidebar.
Toggle the quiz on
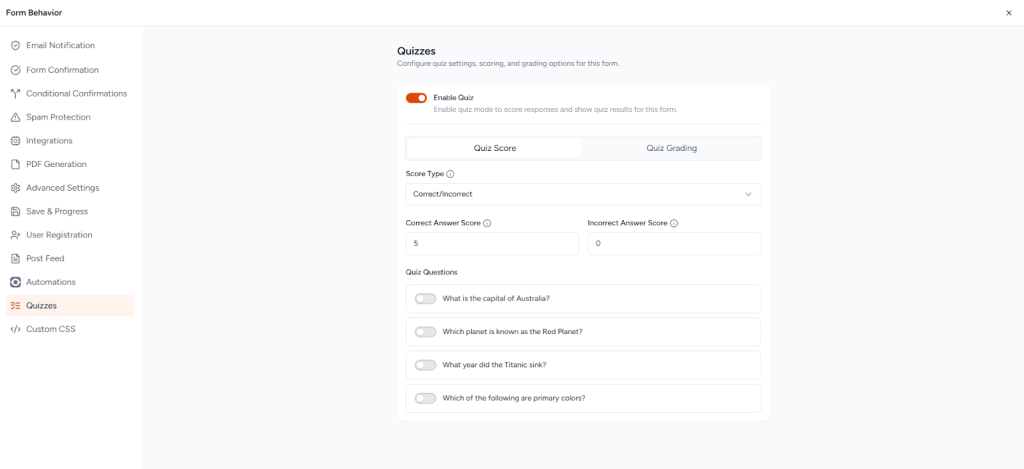
Inside the Quizzes panel, you will see the Enable Quiz toggle. Click it to turn the quiz on. The panel expands immediately to reveal two configuration tabs: Quiz Score and Quiz Grading.
Setting Up Quiz Questions
Once the quiz is enabled, SureForms automatically scans your form for compatible fields and lists them under Quiz Questions on the Quiz Score tab. Every Dropdown, Multi-Choice, or Checkbox field appears as an entry in this list.
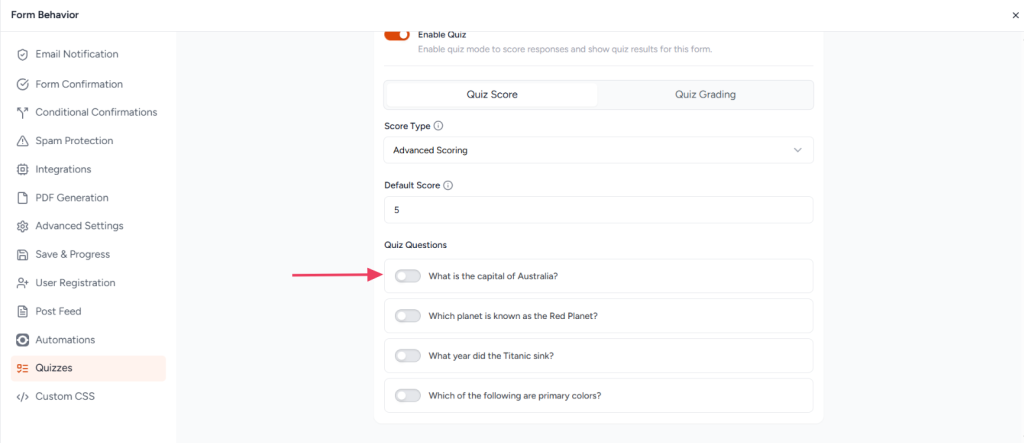
Enable each question and set the correct answer
Click any question row to expand it. For each question you want included in scoring:
- Toggle it On using the question’s enable switch.
- Select the correct answer from the answer options shown. Multi-Choice fields allow multiple correct answers to be selected.
- For Checkbox fields, choose either True or False as the correct answer.
Configuring Scoring
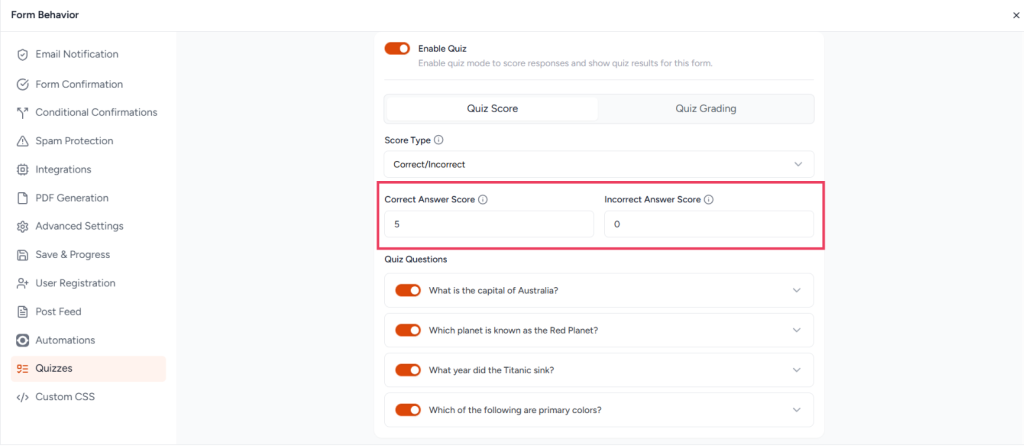
On the Quiz Score tab, choose how points are assigned across the quiz. SureForms provides two scoring modes:
Correct / Incorrect (Default)
Every question is worth the same number of points. Set a flat point value for correct answers and optionally a penalty score for wrong answers:
- Correct Answer Score – points awarded per correct answer (default: 5)
- Incorrect Answer Score – points deducted per wrong answer; enter a negative value for a penalty (default: 0)
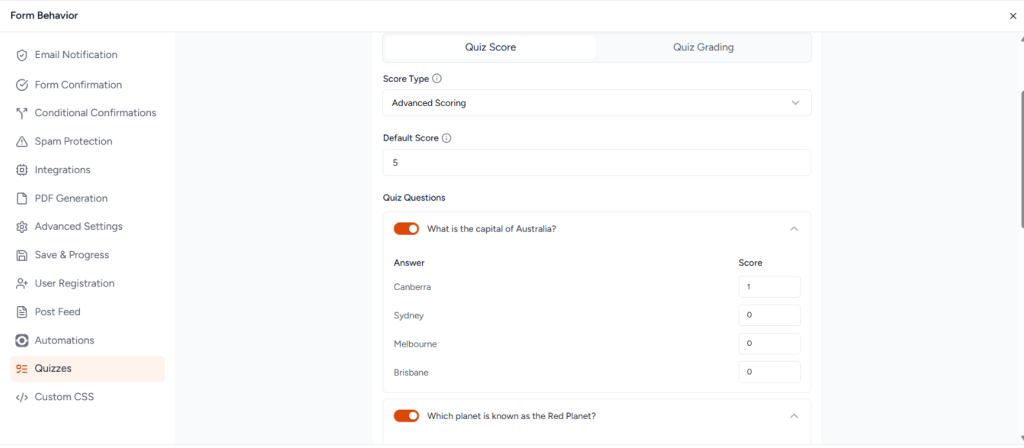
Advanced Scoring
Assign individual point values to each answer option, enabling weighted or partial-credit scoring. A Default Score applies as a fallback for any option without a specific value.
Setting Up Grading
Switch to the Quiz Grading tab to control how the final score is interpreted and what label the respondent receives.
Choose a grading system
The Grading System option offers three choices:
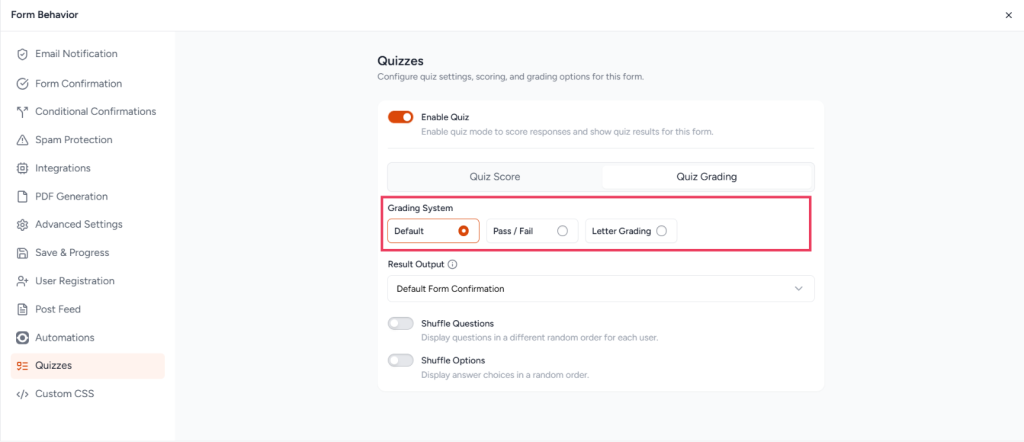
Default
No grading label is applied. Respondents see only their raw score and percentage. Use this option for simple assessments where a pass/fail or letter grade is not needed.
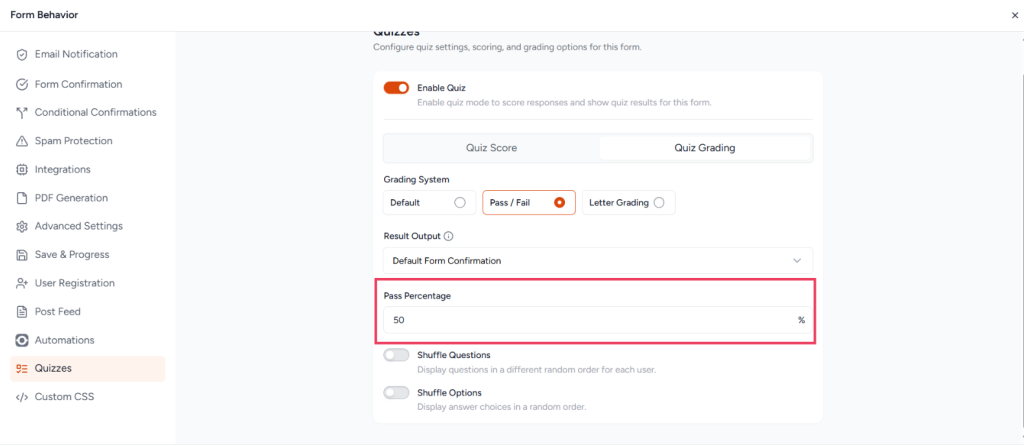
Pass / Fail
Set a Pass Percentage threshold between 0 and 100 (default: 50%). SureForms marks each submission as Pass or Fail depending on whether the respondent’s percentage meets the threshold.
Letter Grading
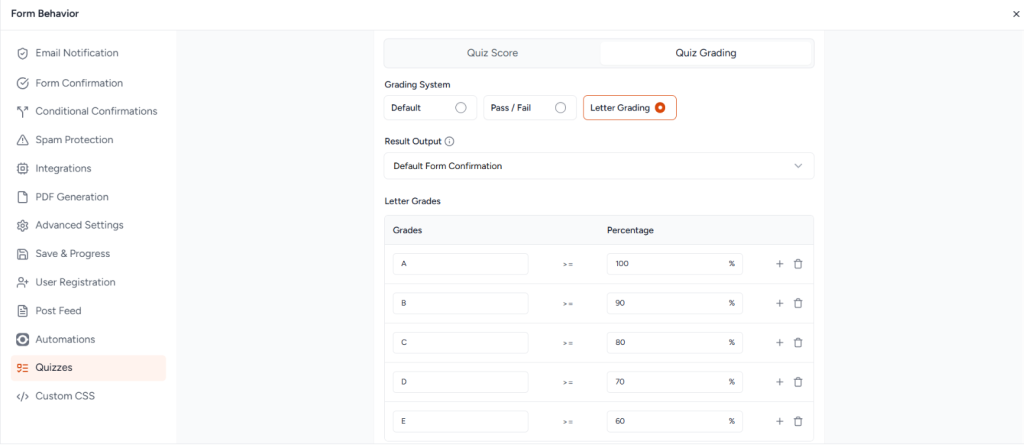
Assign letter grades to percentage ranges using an editable grade table. SureForms includes a default table you can customise:
| Grade | Minimum Percentage |
| A | 100% |
| B | 90% |
| C | 80% |
| D | 70% |
| E | 60% |
You can edit any grade label or percentage inline, add new rows with the + button, and remove rows as needed. At least one grade must remain. Grades are evaluated from the highest percentage to the lowest.
Choosing the Result Output
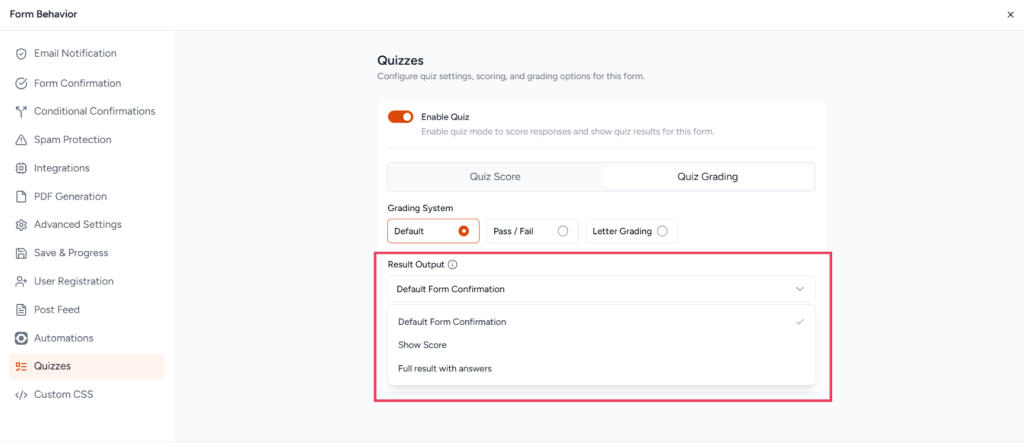
Select what respondents see after submitting
The Result Output dropdown on the Quiz Grading tab controls the post-submission screen. Click the dropdown to choose one of three options:
| Option | What the respondent sees |
| Default Form Confirmation | The standard form confirmation message. Insert quiz smart tags to display results inline e.g., “You scored { quiz_score }, { quiz_pass_fail }!” |
| Show Score | A centered summary screen showing total score, percentage, and grade (if applicable). Replaces the standard confirmation. |
| Full Result with Answers | A detailed question-by-question breakdown showing the respondent’s answers, correct answers, and per-question scores highlighted in colour. |
Randomization
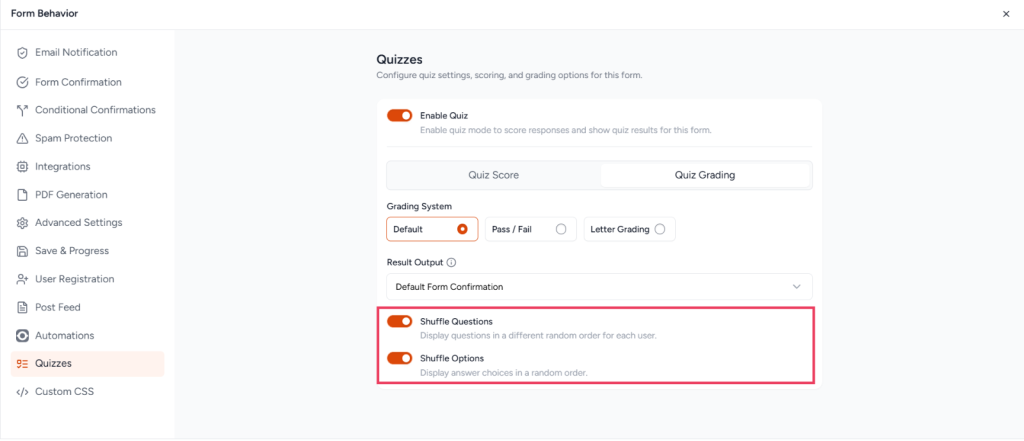
Two optional toggles on the Quiz Grading tab let you shuffle the quiz experience for each respondent:
- Shuffle Questions – randomizes the order of quiz-compatible fields each time the form loads. Non-quiz fields remain in their fixed positions.
- Shuffle Options – randomizes the order of answer choices within each question.
Both toggles are off by default. Randomization is applied at render time on the frontend and does not alter the saved form structure.
Using Quiz Smart Tags
Quiz smart tags let you show results anywhere. SureForms supports smart tags confirmation messages, email notifications, conditional logic, and webhooks. Type { in any smart-tag-enabled field and select from the Quiz section in the dropdown.
| Smart Tag | Example Output | Description |
| { quiz_score } | 8 / 10 | Raw score and maximum possible score |
| { quiz_percentage } | 80% | Percentage achieved |
| { quiz_pass_fail } | Pass | Pass or Fail meaningful only when Pass / Fail grading is active |
| { quiz_letter_grade } | B | Pass or Fail is meaningful only when Pass / Fail grading is active |
| { quiz_result } | (HTML block) | Full question-by-question result markup is ideal for email notification bodies |
Smart tags also work inside conditional logic. For example, you can trigger a congratulations email only when { quiz_pass_fail } equals Pass, or show a different confirmation message based on the respondent’s { quiz_letter_grade }.
Reviewing Quiz Submissions
All quiz submissions are stored separately from standard form entries and are accessible from the SureForms admin menu.
Open the Quizzes page
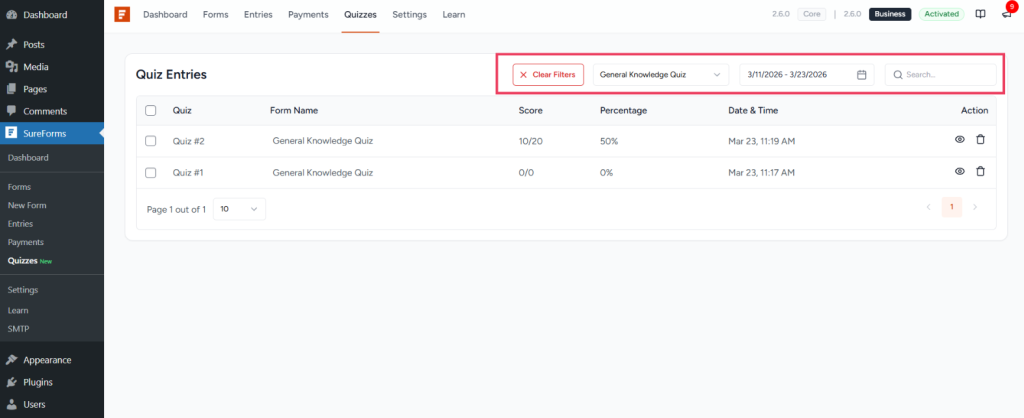
In the WordPress admin sidebar, go to SureForms → Quizzes (the item is marked with a green New badge). This opens the quiz entries list showing every submission with its score, percentage, form name, and date.
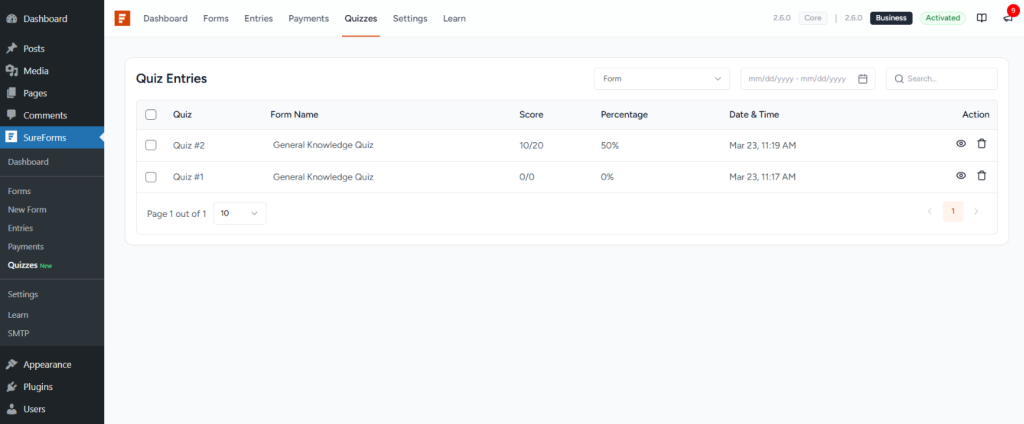
Each row in the table shows:
- Quiz – formatted as “Quiz #123”; click to open the detail view
- Form Name – the parent form’s title, linking to the published form
- Score – displayed as score / max_score (e.g., 8 / 10)
- Percentage – the percentage achieved (e.g., 80%)
- Date & Time – submission date; hover for the full timestamp tooltip
- Actions – eye icon to view detail, trash icon to delete
Filter and search entries
Use the filter bar above the table to narrow down results:
- Form – multi-select dropdown to filter by one or more quiz forms
- Date Range – From / To date pickers to filter by submission date
- Search – search by quiz entry ID (press Enter to apply)
- Clear Filters – resets all active filters; appears only when filters are applied
To delete multiple entries at once, select rows using the checkboxes and click the Delete button that replaces the filter bar. A confirmation dialog shows the count of entries to be removed.
View a quiz entry in detail
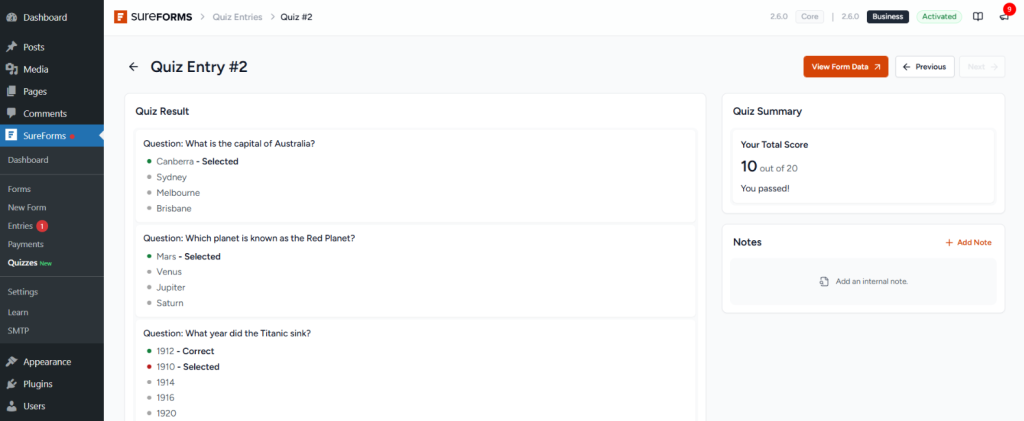
Click any entry row or the eye icon to open the entry detail page. The page uses a two-column layout:
- Left – Quiz Result: a question-by-question breakdown with colour-coded status dots (green = correct answer, red = selected but incorrect, grey = unselected). Each option displays a Selected or Correct badge.
- Right – Quiz Summary: total score, pass/fail status, letter grade, and percentage in a summary card. A Notes panel below it lets you add internal notes about the submission.
Adding Notes to a Quiz Entry
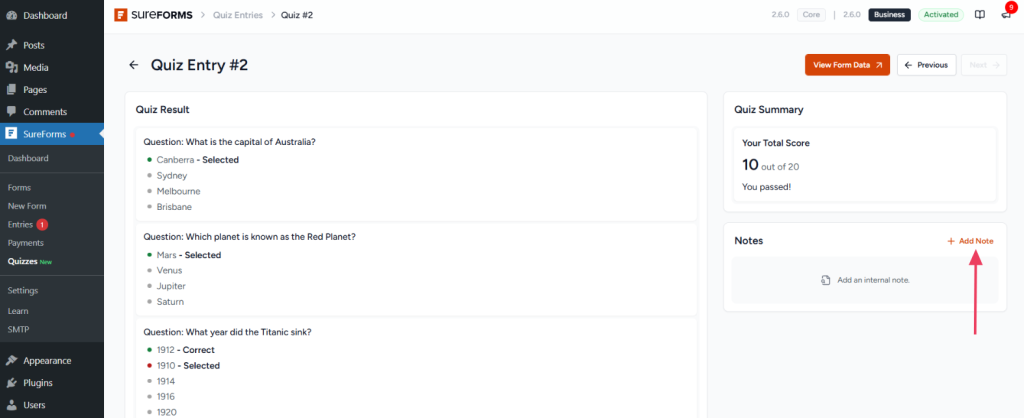
The Notes panel on the entry detail page lets you keep internal records for manual review or grader feedback.
- Click Add Note to open an inline textarea.
- Type your note and click Save, or press Cmd/Ctrl + Enter to submit.
- Notes appear in reverse-chronological order (newest first) with author name and timestamp.
- Click the trash icon on any note to delete it immediately.
🎉 You’re All Set!
Your quiz form is configured and ready to collect responses.
Upgrade to access the Quiz feature, scoring, grading, quiz entry, and more.
We don't respond to the article feedback, we use it to improve our support content.